Give me 45 minutes and I will give you superpowers
You keep hearing that AI will revolutionise productivity. But every time you open ChatGPT, the experience feels the same: you ask a question, you get a wall of text, and you are still the one who has to do the actual work. The gap between the promise and the reality is frustrating.
Here is the secret most people are missing: the limitation is not the AI model. It is how you access it.
There is a category of AI tools that goes far beyond chat. They are called AI coding agents, and they work like having a personal software developer on call. You describe what you want in plain language. The agent writes the code, installs dependencies, tests for errors, and delivers a finished product for you to review. No copying and pasting. No debugging. No programming knowledge required.
This is a hands-on tutorial. By the end, you will have:
- Built a fully functional expense tracking and tax calculation dashboard that runs in your browser
- Learned how to install and use AI coding agents for any project
- Understood how to write effective prompts that turn ideas into working software
- Gained the confidence to build custom tools for yourself or your business, starting today
The example uses a small South African electrical company, but the principles apply to any business, anywhere. The real value is not the dashboard. It is learning that you can build any tool you need.
Who this is for
This tutorial is especially useful if you:
- Run a small business, freelance practice, or consultancy
- Spend time manually categorising expenses or preparing tax documents
- Want custom software but cannot justify hiring a developer
- Are curious about AI but feel stuck at the "chat with a bot" stage
No prior programming experience is needed. If you can create a folder and download a file, you have all the skills required.
What we are building
We are building an expense tracking and tax calculation dashboard. It pulls transaction data from CSV files downloaded from your bank or financial institution and presents it as a web application in your browser with three pages:
- Expenses overview: All expenditures categorised in an accounting ledger view, with expandable line items for each category
- Tax breakdown: Business tax information calculated for SARS, including cryptocurrency income treatment
- Double check: Transactions the AI was uncertain about, flagged for your review with a best-guess category alongside options to correct it
Here is a quick demo of the finished product. Do not worry about understanding every detail in the recording yet. We will walk through each page later.
Building a web application sounds complicated, but that is exactly the point of using a coding agent. You describe what you want in plain English. The agent handles everything else.
A note if you are following along: Your final product will look different from the screenshots in this tutorial. The AI customises the software based on your specific data, instructions, and feedback. That is a feature, not a bug. You end up with purpose-built software that you own entirely. No monthly subscription. No expensive licence. No one-size-fits-all compromise. Your code lives on your computer, evolves with your needs, and costs nothing to run.
What is an AI coding agent (and how is it different from ChatGPT)?
AI coding agents use the same large language model technology that powers chatbots like ChatGPT, but they interact with your computer the way a software developer would. They read files, create new ones, install software, run code, and fix errors, all autonomously.
The key distinction is in that last word: autonomously.
With a traditional chatbot, you ask for help building a website. The chatbot generates code and pastes it into the chat window. It is still up to you to copy that code into a file, figure out how to run it, troubleshoot errors, and get everything working. You are doing the hard part.
With a coding agent, you describe what you want. The agent does the rest. It creates the files, installs whatever packages are needed, writes and runs the code, catches and fixes errors, and alerts you when the finished product is ready for review.
This requires a mindset shift. You are not asking the AI to help you be a software developer. You are giving the AI the job of being the software developer, while you focus on what the software should do.
Want to find where AI fits in your business?
We map your operations and pinpoint the AI opportunities that will save you the most time and money — for free.
Book Your Free AI AuditStep-by-step setup
1) Choose your coding agent
Several AI coding agent providers are available. You can use whichever one you prefer. The most popular options, each requiring a paid account, are:
- Claude Code (Anthropic)
- Gemini CLI (Google)
- OpenAI Codex (OpenAI)
LM Arena provides independent benchmarks if you want to compare models before choosing.
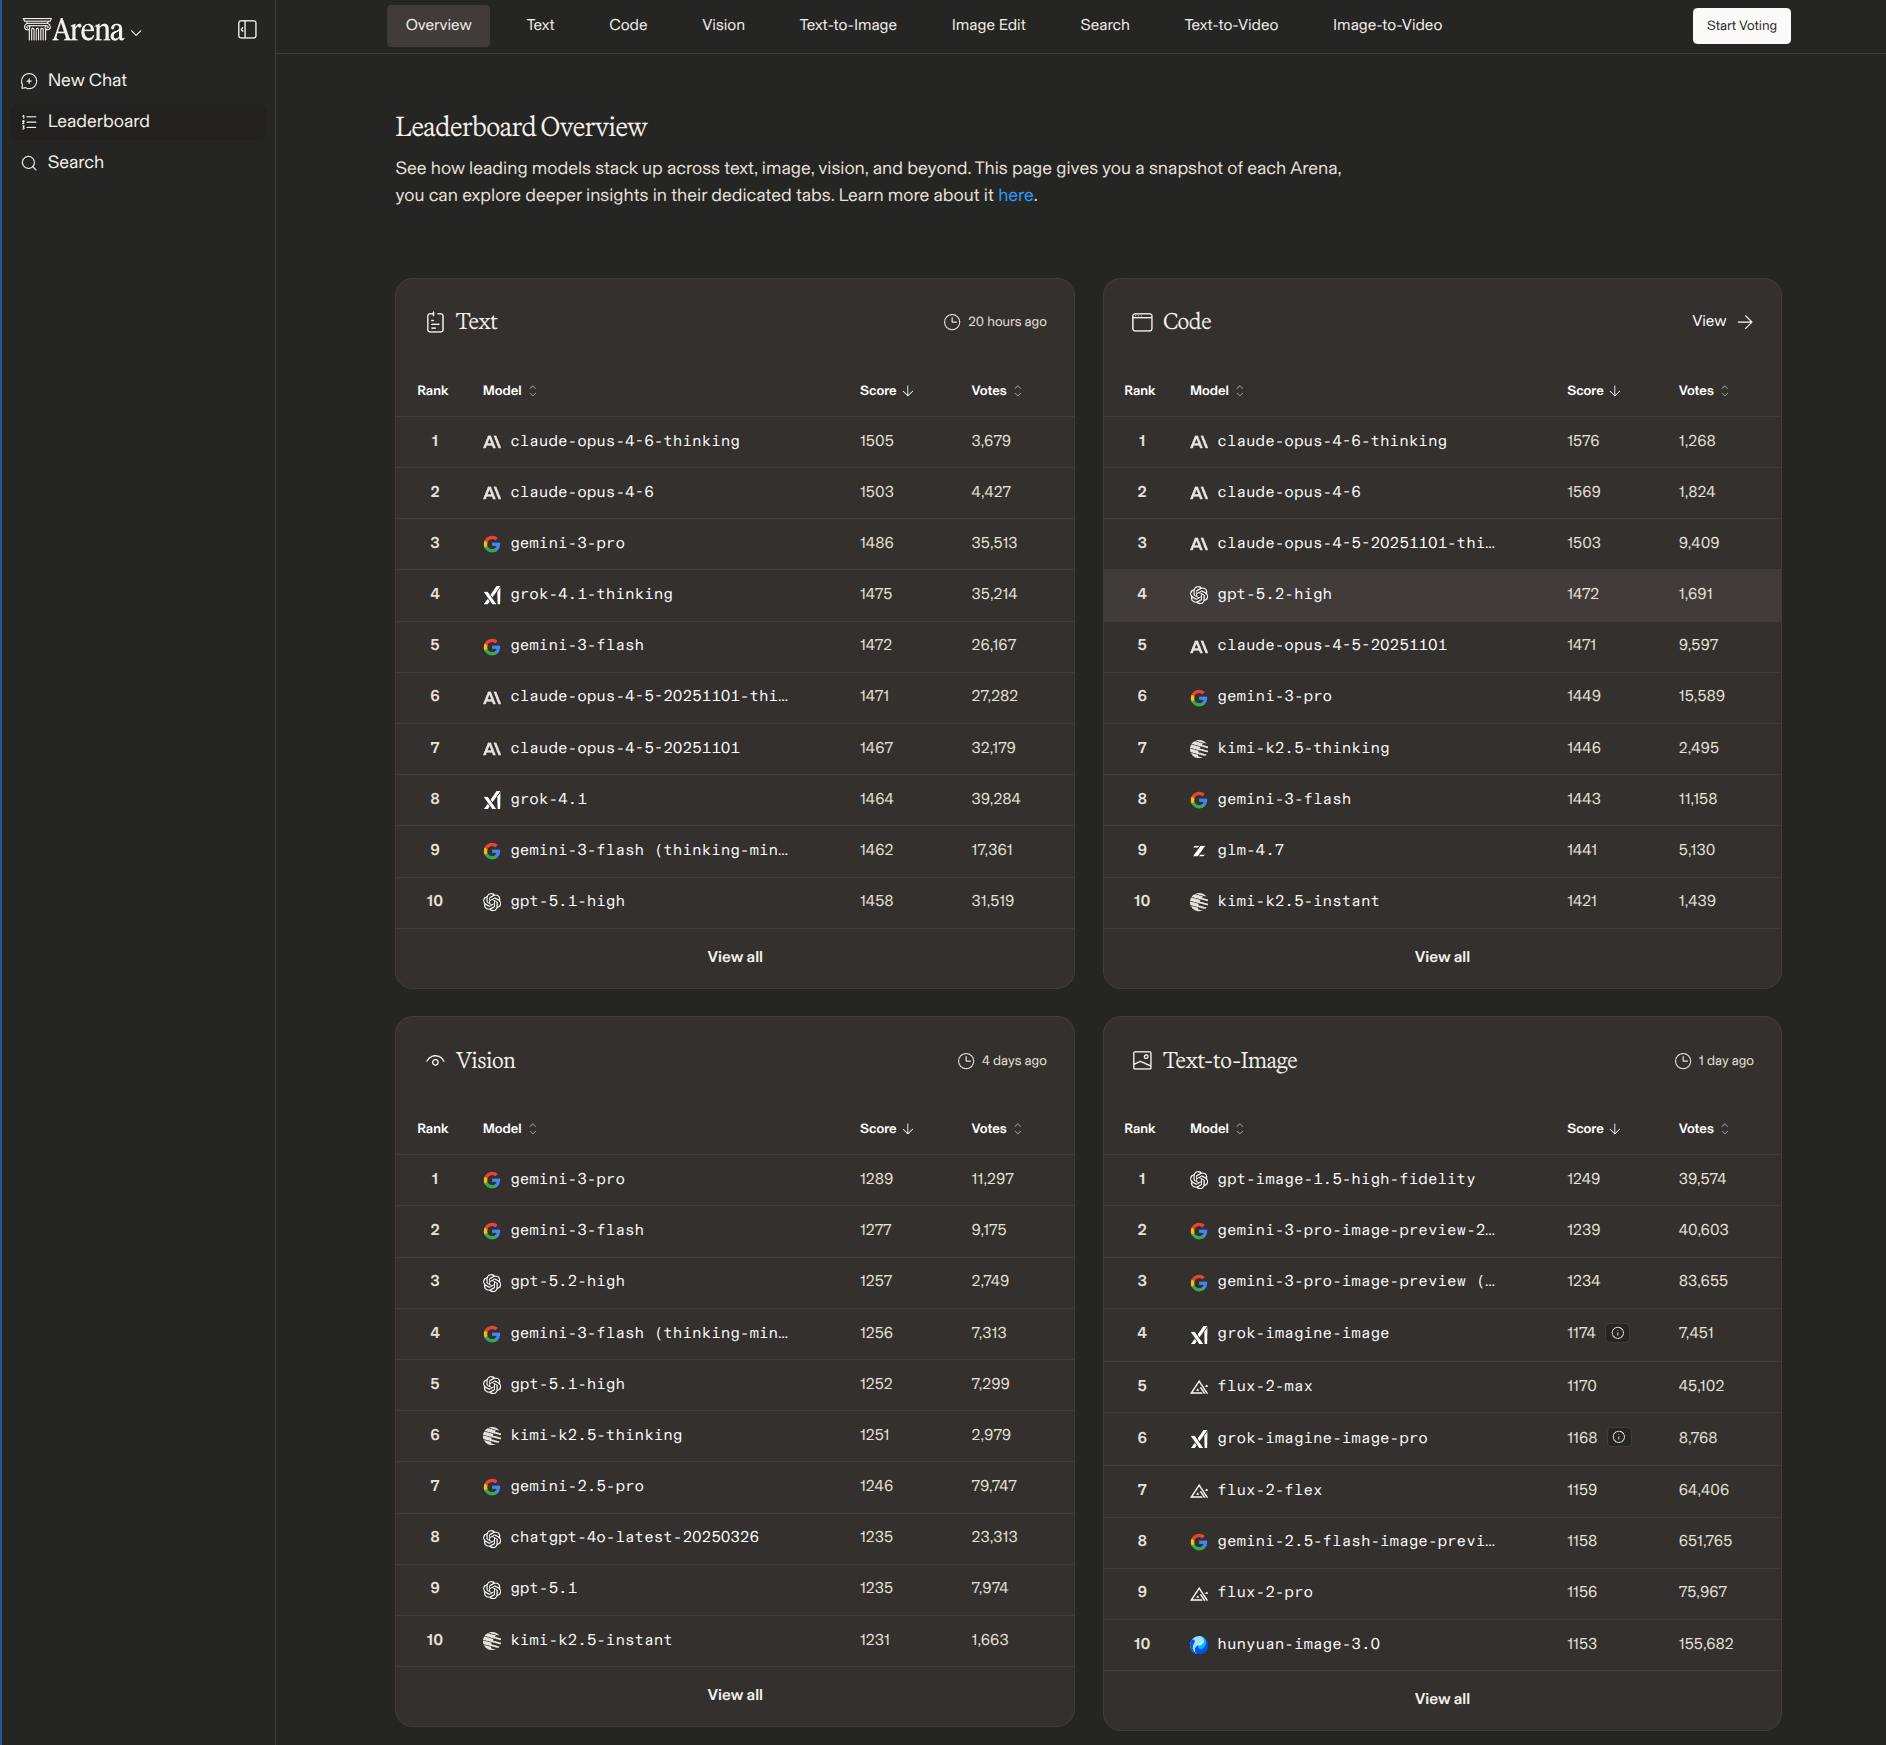
This tutorial uses Claude Code, but the workflow is nearly identical across all three.
2) Install the prerequisites
Before installing your coding agent, you need two dependencies. Install them in this order:
- Node.js: Download from https://nodejs.org/en/download
- UV (Python version and package manager): Install from https://docs.astral.sh/uv/getting-started/installation/
Once both are installed, follow the installation instructions for your chosen coding agent.
If you run into issues: Paste the error message into any AI chatbot along with your operating system details and ask for help. This is one of the easiest problems for AI to solve.
3) Create a project folder
Open your terminal and run the following commands:
cd ~/ # Navigate to your home directory
mkdir tax_website # Create a new project folder
cd tax_website # Move into the project folder
Two terminal commands are all you need to know:
mkdircreates a new foldercdmoves you into a folder
4) Add your financial data
Create a Data folder inside your project and organise your CSV files into subfolders by institution.
In this tutorial, the example business has data from two sources:
- Capitec bank statements: Monthly CSV files downloaded from the Capitec website, one per month
- Luno cryptocurrency exchange: Two CSV files from the business's Luno wallet, one for Bitcoin and one for Ethereum
Your folder structure should look something like this:
Data/
├── Capitec/
│ ├── 2025-03.csv
│ ├── 2025-04.csv
│ ├── 2025-05.csv
│ ├── ...
│ ├── 2026-01.csv
│ └── 2026-02.csv
└── Luno/
├── BTC/
│ └── Luno_BTC_Mar2025_Feb2026.csv
└── ETH/
└── Luno_ETH_Mar2025_Feb2026.csv
If you are following along with your own data, your structure will be different. For example, if you bank with FNB and Absa, it might look like this:
Data/
├── FNB/
│ ├── Transactional/
│ │ ├── FNB_Mar2025_May2025.csv
│ │ ├── FNB_Jun2025_Aug2025.csv
│ │ ├── FNB_Sep2025_Nov2025.csv
│ │ └── FNB_Dec2025_Feb2026.csv
│ └── CreditCard/
│ ├── FNB_CC_Mar2025_May2025.csv
│ ├── FNB_CC_Jun2025_Aug2025.csv
│ ├── FNB_CC_Sep2025_Nov2025.csv
│ └── FNB_CC_Dec2025_Feb2026.csv
└── Absa/
└── Savings/
├── Absa_2025-03.csv
├── Absa_2025-04.csv
├── ...
├── Absa_2026-01.csv
└── Absa_2026-02.csv
Notice that the CSV formats differ between institutions. Normally this would mean tedious manual conversion. The AI handles that for you.
5) Launch the agent
Navigate to your project folder and start the agent:
cd ~/tax_website
claude # Or: gemini for Gemini CLI, codex for OpenAI Codex
You may be asked to grant permissions for reading, editing, and executing files on your computer:
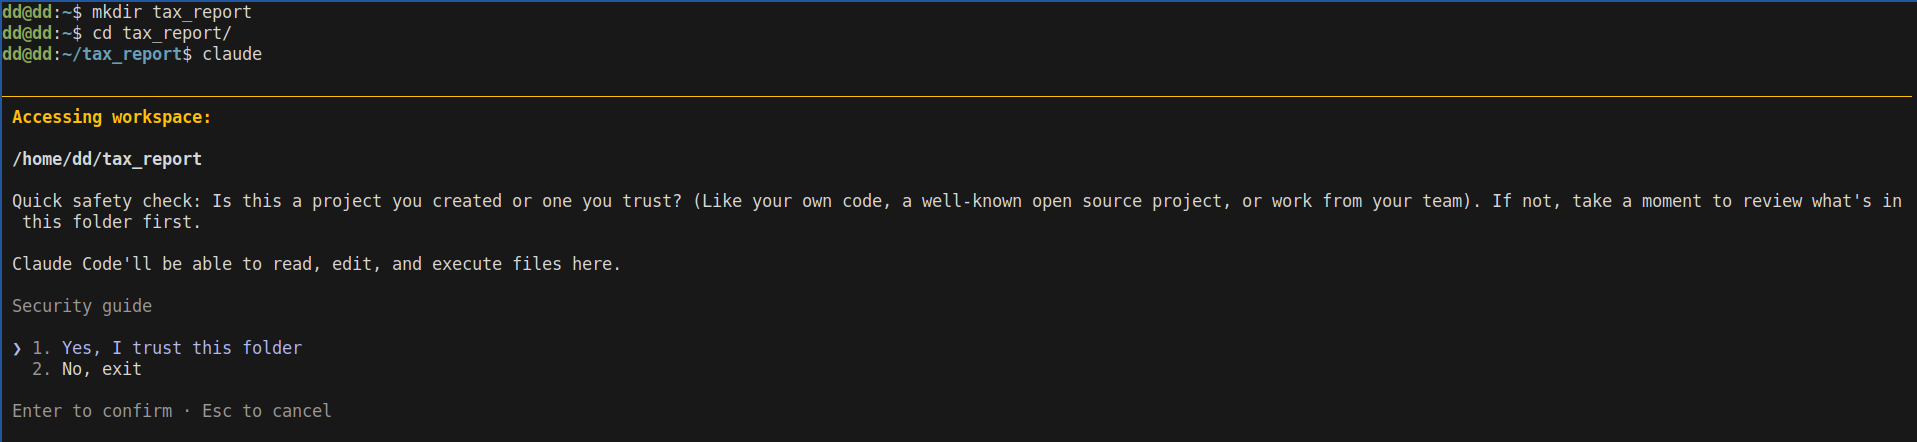
Press enter to accept, and you will see the startup screen:
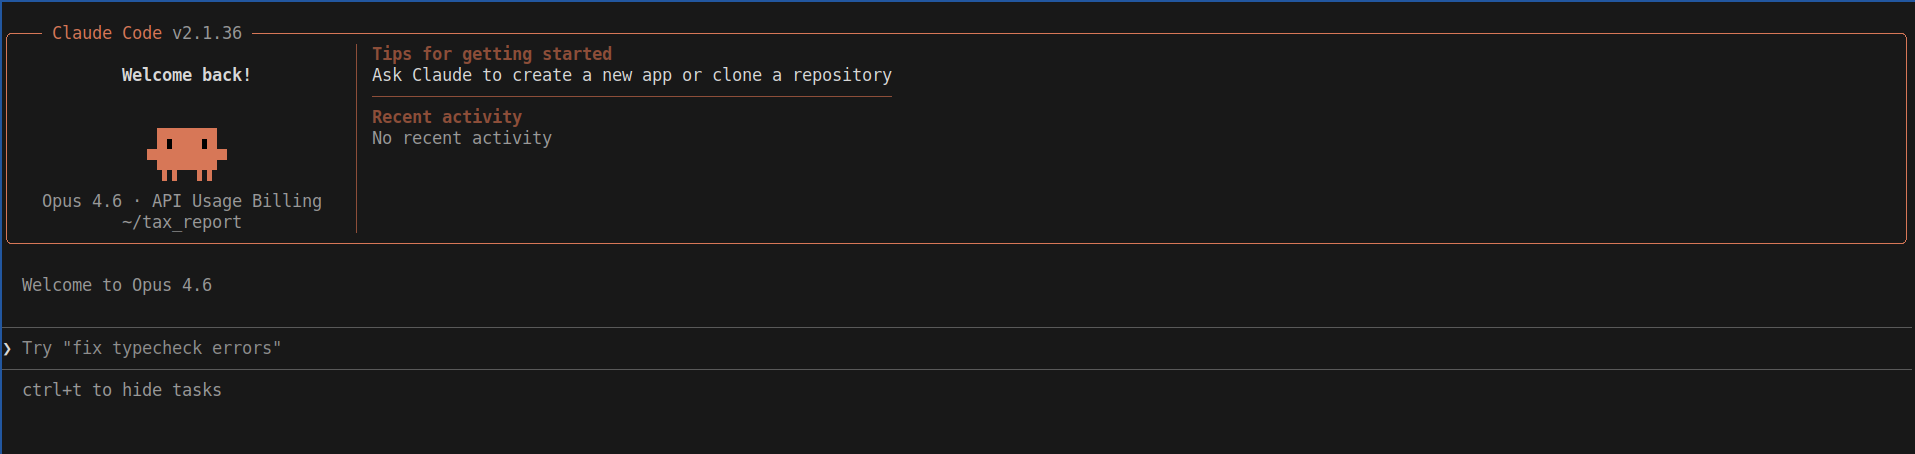
You are ready to go. Type / to see the available commands:
The four most useful commands when starting out:
/model-- Switch between AI models (Sonnet, Opus, Haiku)/cost-- Check how much the current session has cost/resume-- Pick up a previous conversation where you left off/clear-- Wipe the conversation and start fresh
First task: let the agent explore your data
Before building anything, give the agent a chance to understand what it is working with. Copy and paste this prompt:
Analyze the Data folder and create a report named expenses_overview.md that details the nature and structure of the contained transactional data.Press enter and watch it work:
This step is not strictly necessary, but it serves two purposes. First, it gives you confidence that the agent understands your data correctly. Second, it gives the agent context that improves everything it builds next.
Building the dashboard: the prompt
Now for the main event. To build the dashboard, you provide a natural language description of what you want. In AI terminology, this is called a prompt. Read through the one below, and then we will break down the techniques it uses.
Build an expense tracking and tax calculation web app for my South African electrical business.
- Expenses overview page: Categories of expenditures displayed in an accounting ledger view. Clicking any entry expands a dropdown showing all individual items in that category. Create appropriate headings and subheadings for each expense type.
- Tax breakdown page: Overview of business tax information for SARS. Research what a South African electrical business would need for tax compliance (including how cryptocurrency income is treated) and build the appropriate tax page.
- Double check page: Transactions that are uncertain in their classification should be flagged for human review here. Show the best-guess category alongside options to correct it.
- UV for Python version and package management
- Flask for web server
Expense data is in the Data/ folder with subfolders for each institution:
- Capitec/ - Transaction history for my business transactional account
- Luno/ - Cryptocurrency payments I receive (Bitcoin and Ethereum)
Before building, analyze the data files to understand their structure and formats.
- Store all data in local JSON files
- Process each raw transaction into a
processed_transactions.jsonfile with the information needed for the app - For uncertain entries, flag them for review but also assign a best-guess category
- Track which transactions have been processed to avoid duplicates on re-import
Paste that prompt into your agent, press enter, and watch it build:
You may need to approve tool access occasionally. Use your arrow keys to select the option you want and press enter to confirm.
Why the prompt is structured this way
Each section of the prompt plays a specific role, much like a brief you would hand to a human contractor.
- Opening line -- state the goal and inject context.
Build an expense tracking and tax calculation web apptells the agent what to build....for my South African electrical businessgives it the context to make smart decisions about currency, tax law, and terminology. - Pages -- define features with the right level of detail. Some features are described precisely (
Clicking any entry expands a dropdown showing all individual items in that category). Others are deliberately left open for the agent's judgment (Research what a South African electrical business would need for tax compliance). Knowing when to specify and when to delegate is the most important prompting skill you will develop. - Technology -- choose the stack. This section tells the agent which programming language and tools to use. If you have no preference, you can omit it entirely and the agent will choose for you. The choices in this tutorial (Python, UV, Flask) work well for most small projects and are safe to reuse.
- Data Sources -- point to the data and explain what it represents. This prevents the agent from making assumptions about your data. Be specific about where files are and what they contain.
- Data Storage -- specify how data should be handled. Requesting a
processed_transactions.jsonfile forces the agent to create a pipeline that takes messy raw data and cleans it for the app. Flagging uncertain entries for review keeps a human in the loop. Tracking processed transactions prevents duplicates on re-import, a common edge case worth handling upfront.
Reviewing the finished product
After roughly 30 minutes of uninterrupted work, the agent finishes and presents a summary of what it built: the pages it created, the URLs where each feature lives, and a high-level report on the tax calculations it implemented.
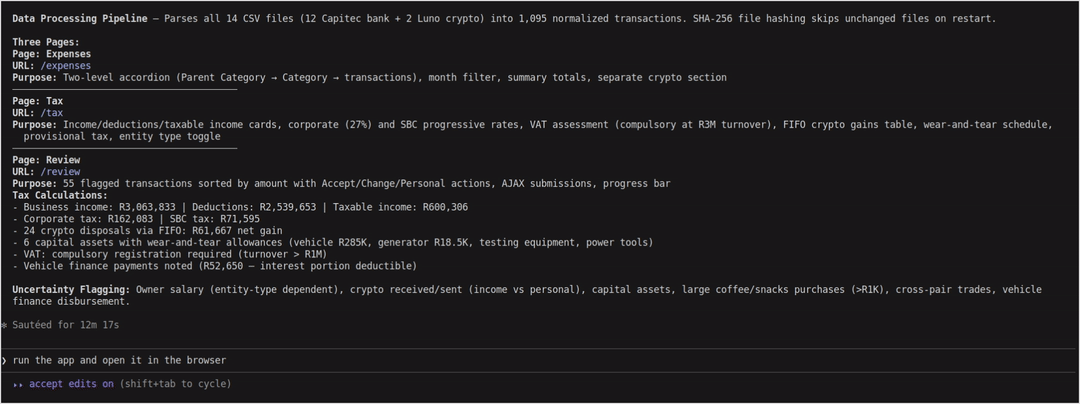
The agent also suggests a next step: run the app and open it in the browser. Select that option, and the agent will launch the website on your local machine.
An important note: Even though the software runs in your browser, it is not on the internet. The URL will show something like localhost:5000, meaning only you can access it. Your data stays entirely on your computer.
Once the server starts, your dashboard opens in the browser. Here is what each page looks like.
Expenses page
The expenses are correctly extracted and categorised from the raw financial data. Major categories have headings and subcategories, and each can be expanded to reveal the individual line items, exactly as specified in the prompt.
Notice something we did not ask for: the AI added the ability to filter expenses by month or view the entire year at once. Given the context of what this software does, the agent decided that feature made sense and included it. If you did not want it, a single follow-up instruction would remove it.
Tax calculation page
The tax page displays the information the agent determined a South African electrical business would need. Recall that we deliberately left this open-ended in the prompt: Research what a South African electrical business would need for tax compliance.
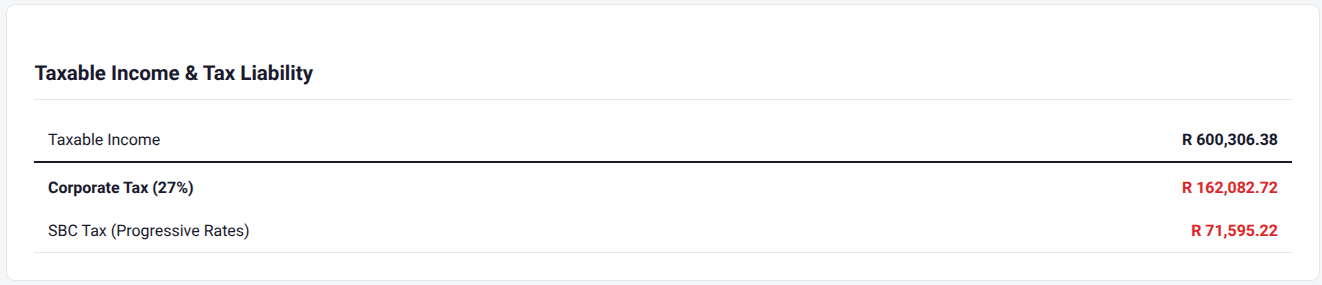
Based on that instruction, the agent catalogued income and expenses, calculated taxable income and tax liabilities, flagged that the business turnover requires VAT registration, reported cryptocurrency gains and losses with current holdings, identified provisional tax payment schedules, and built a depreciation schedule for current assets. It even included a toggle to switch between company and individual tax reporting.
Since we deferred to the model's judgment, we should not expect perfection on the first pass. And indeed, the agent applied both full corporate income tax and Small Business Corporation (SBC) tax rates, which is incorrect for this business.
This is exactly where owning your own software pays off. You can fix it immediately.
Fixing errors with a follow-up prompt
Correcting the tax calculation requires a single follow-up instruction. The SARS website publishes the current SBC tax brackets, so we point the agent directly to that source:
Fix the "Taxable Income & Tax Liability" calculation in the /tax page. Currently it calculates both income and Small Business Corporations (SBC) tax. This is incorrect, we are only required to pay SBC tax. Look at https://www.sars.gov.za/tax-rates/income-tax/companies-trusts-and-small-business-corporations-sbc/ which gives the listing of SBC tax brackets and calculations and update the page to use this new method of tax calculation.In about two minutes, the fix is applied. But notice something subtle: the agent did not just remove corporate income tax. It also detected that the SBC tax brackets it was using were out of date and updated them to the current rates from the SARS website. It went beyond the literal instruction and fixed a problem we had not even identified yet.

Review page
The review page displays every transaction the AI was uncertain about, each flagged with a reason explaining why it needs human attention. This gives you context that saves time during review.
You will also notice that some of the button labels are ambiguous. "Accept" is clear enough, but "Personal" could mean several things. This is another opportunity to refine the software with a follow-up prompt, just as we did with the tax calculation.
This review-and-refine loop is the normal workflow with AI coding agents. The first output is rarely perfect, but each iteration takes minutes, not hours.
The real leverage is the prompt, not the tool
It is tempting to think the magic is the coding agent. It is not. The leverage comes from how clearly you describe what you want.
Focus on four principles when writing prompts:
- State the goal and provide context upfront. Tell the agent what to build and who it is for.
- Be specific where it matters, and delegate where it does not. Describe critical features in detail. For everything else, let the agent use its judgment, then correct on review.
- Point to your actual data. Never let the agent assume what your data looks like. Tell it where the files are and what they contain.
- Handle edge cases explicitly. Flag uncertain items for review. Prevent duplicates. Specify storage formats. The more guardrails you set in the prompt, the fewer problems you fix later.
Once you internalise these principles, you can build far more than expense dashboards. You can build any tool or system you need.
What you have learned
You have moved beyond the "I use ChatGPT" stage of AI literacy. In this tutorial, you have:
- Installed an AI coding agent and its dependencies
- Set up a project with real financial data
- Written structured prompts that turned a plain-language description into a working web application
- Evaluated the output, identified errors, and iterated with follow-up prompts to fix them
This is a fundamentally different way of using AI. You are not asking it to help you code. You are giving it a job and reviewing the result. That distinction changes what is possible.
What comes next
This tutorial is the first in a series on practical AI tools that go beyond chatbots. Future posts will cover other ways to use AI agents for real business tasks.
Subscribe to the mailing list to get notified when new posts go live, or reach out via email or WhatsApp with questions about integrating AI into your business.
Start with one small project. See what the agent builds. Iterate. Then decide what to build next.
Get notified when we publish the next guide
Read next: Build a Gmail Drafting Agent with Claude — another hands-on guide to automating real business tasks with AI, no coding needed.